From the Instruction wheel, click the Standards button on the toolbar

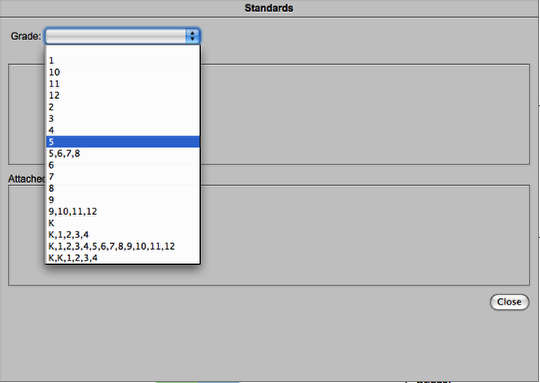
Choose a Grade to reveal Subjects
Choose a Subject to reveal Strands

Choose a Strand to reveal Standards

Choose a Standard to reveal Benchmarks
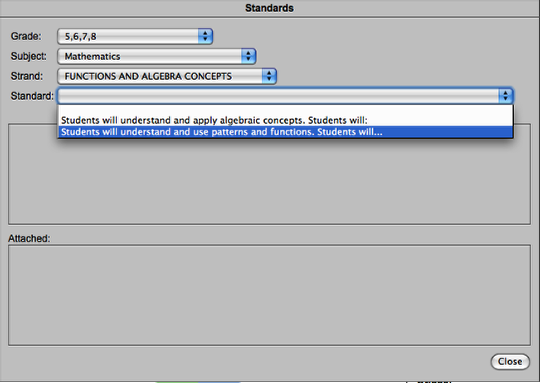
Note: The standard may be longer than the menu. To see the entire standard, roll over it with your mouse to reveal a tooltip for that standard.
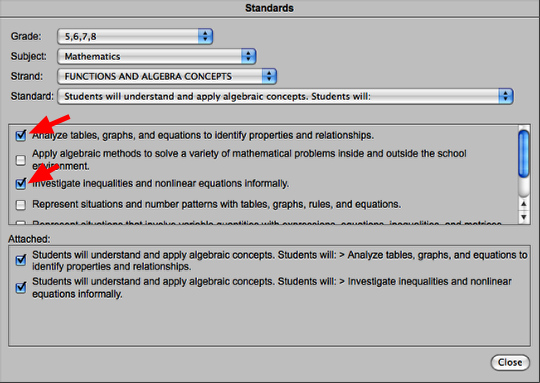
Click a benchmark’s checkbox to attach it your lesson.
To see your standards in action, click on the Print button on the toolbar.

Scroll down the Print view to the Standards Aligned section of this report

To detach a standard, go to the Standards screen then uncheck the benchmark

The standard will be removed from the Standards screen and the lesson’s prinout immediately.
Filed under: Uncategorized | Leave a Comment
Editing the Assessment
From the List View, click any lesson you have created.
Note: You can only edit lessons that you wrote. To edit any lesson, you must be logged in.
Click the Assessment button on the toolbar

Click on a step to enter its detail screen

Click Edit to open up the step for editing

Make your modifications, then click save at the bottom of the screeen

Filed under: Uncategorized | Leave a Comment
Editing the Curriculum Framework
From the List View, click any lesson you have created.
Note: You can only edit lessons that you wrote. To edit any lesson, you must be logged in.
Click the Curriculum button on the toolbar

Click Edit to open up the lesson for editing

Make your modifications, then click save at the bottom of the screeen

Filed under: Uncategorized | Leave a Comment
Popin Instructional Activities
To add suggested strategies for an instructional step, first enter the step while logged in.
Help on logging in and editing a step.
At the bottom of the editing screen, click the Assistance button

Browse the suggested template actitivies for the step. Click Transfer to add to your lesson.

(1) Browse through the suggested activities for this instructional step. (2) Click transfer to add to your lesson. You will be prompted to confirm this, as the transfer will replace the existing contents of the step.
Filed under: Uncategorized | Leave a Comment
From the List View, click any lesson you have created.
Note: You can only edit lessons that you wrote. To edit any lesson, you must be logged in.
If you are logged in, the instruction wheel screen will have an Edit and Delete button.

To edit the text of the wheel, click Edit.

This will "open up" the wheel. (1) Make any modifications, (2) then click Save.
To edit a detail step, click the step you wish to edit.

Click Edit to open up the step for editing

Make your modifications, then click save at the bottom of the screeen

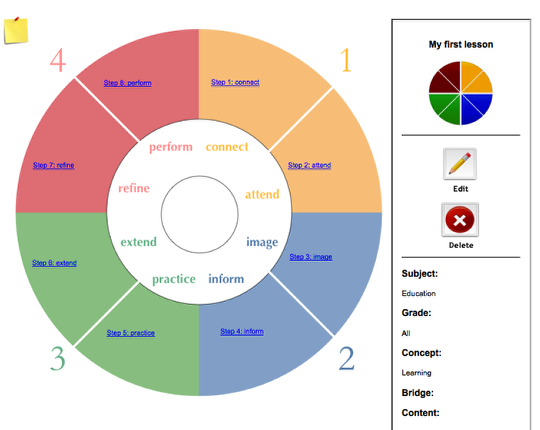
The top section of this screen is the text for the wheel. The bottom section is detail for the step.
Filed under: Uncategorized | Leave a Comment
Creating a New Lesson
From the List View, click the New button

Fill in the Title, Subject Grade, etc. and the steps of the wheel

Click Save to create the new lesson

This takes you to the main instructional wheel view, where you may add additional details.
Filed under: Uncategorized | Leave a Comment
From the List VIew, click the Assistance button

Then title your lesson and list the steps of instruction on the right
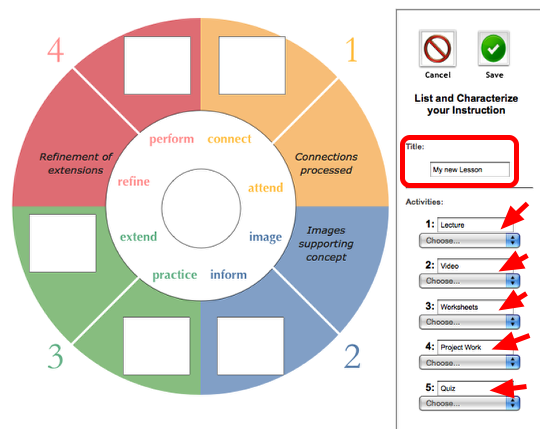
Use the dropdown menus to characterize eacah instructional step listed

In this example, our Lecure would be characterized as Information Delivery, the video as Information Delivery, the Worksheets as Practicing Skills, the Project Work as Projects/application and the Quiz as Learner Performance.
Use the transfer button to see how your instructional steps fit on the 4MAT Instruction wheel.

When you’re ready to save, click the Save button

This leads to the instruction view, where you can see the balance of your lesson and refine it.

Filed under: Uncategorized | Leave a Comment
From the List View, click the Wizard button

FIll in the basic information

Fill in the Curriculum framework

Fill in the steps for the instructional wheel

This worksheet begins with the traditional instructional steps such as knowledge transfer and skills development then moves to more complex steps, such as connecting to learners, extending into the world and creative use of material learned.
Click Save to create the new unit.

(Or click Cancel to cancel.)
Filed under: Uncategorized | Leave a Comment
Getting Logged In
Getting to the Login Screen

Only registered users can edit lessons or create new lessons. If oyu have a user name and password, click the Login link from the List View to gto to the login screen.
Logging in

Enter your user name (usually your email address) and password to login.
Checking to See if your are logged in

If you are logged in you will see your login name on the top of the list view. As a registered user, you have access to creating new lessons and editing your existing units.
Filed under: Uncategorized | 4 Comments
Searching for Lessons
Start in List View

Click the Search button to reveal the search fields

Enter one or more search criteria then click Search

The list of lessons is now limited to your search criteria

To view all lessons again, empty all the search fields, then click search again.
Filed under: Uncategorized | Leave a Comment
